Microsoft Defender for Business : Configuration and mangement with Intune
- aymeneljaziri
- 3 juil. 2025
- 7 min de lecture

1 - Introduction
In a world of constantly evolving cyber threats, small and medium-sized enterprises (SMEs) are often the most vulnerable. Microsoft Defender for Business is a robust, affordable cybersecurity solution specifically designed to meet the unique needs of SMBs. This solution offers advanced protection against malware, ransomware and other threats, while being easy to deploy and manage. In this article, we'll explore the key features of Microsoft Defender for Business and how it can help your business stay secure in an increasingly complex digital environment.
2 - Partial view of Microsoft Defenders & Licenses

3 - What is Microsoft Defender for Business
Microsoft Defender for Business is a cybersecurity solution designed specifically for small and medium-sized enterprises (SMEs) with fewer than 300 users.
Here are some of its key features:
Advanced protection : Provides enterprise-class protection against ransomware, malware, phishing and other threats.
Vulnerability management : Identify and correct software weaknesses and configuration errors that pose the greatest risk to your business.
Automated detection and response : Use artificial intelligence to automatically detect and respond to cyber threats, including ongoing ransomware attacks
Ease of use : security policies can be activated instantly thanks to simple configuration wizards
Cross-platform protection : Compatible with Windows, macOS, iOS and Android with up to 5 devices for every licence.

Microsoft Defender for Business is also cost-effective, with pricing to suit SMB budgets. It is available as a stand-alone product or as an add-on to Microsoft 365 Business Premium (https://www.microsoft.com/en-us/security/business/endpoint-security/microsoft-defender-business).
4 - Licinsing
To use Microsoft Defender for Business, you need one of the following licenses:
Microsoft 365 Business Premium : This license includes Microsoft Defender for Business, offering a complete security and productivity solution for small and medium-sized businesses (https://learn.microsoft.com/en-us/defender-business/mdb-requirements).
Microsoft Defender for Business (standalone) : If you do not wish to use Microsoft 365 Business Premium, you can opt for the standalone version of Microsoft Defender for Business (https://learn.microsoft.com/en-us/defender-business/mdb-requirements).
For servers, you'll need an additional license called Microsoft Defender for Business servers. Note that there is a limit of 60 server licenses per subscription (https://learn.microsoft.com/en-us/defender-endpoint/minimum-requirements).
5 - Pricing
Microsoft Defender for Business is included with Microsoft 365 Business Premium, but it can be used as stand alone licence, keep in mind price is always changing, you can see pricing from this link (https://www.microsoft.com/en-us/security/business/endpoint-security/microsoft-defender-business):

6 - Mindmap

7 - Start Configuring Microsoft Defender for Business
A - Enabling Microsoft Defender for Business
Go to Microsoft Defender portal : https://security.microsoft.com/
Click "Get started"

New configuration windows will appear :
add system admin user and select "Continue"

Add email notification for incident & vulnerabilities.
Click "Continue"

Select "All windows devices" then click "Continue" (you can select specefic device group if you want)

Enable "Security settings"
In this article, I'll configure all settings through Intune, for this, I'll select "Continue using Intune"

Click "submit" to finish configuration.

Now we are done with Defender enabling, let's move to verify alerts notifications and vulnerabilities notifications.
Normally alerts are automatically created when Microsoft Defender for Business is activated, but I've noticed that the alerts weren't created correctly, so we're going to double-check and create them.
B - Setup alerts notifications
Configuring alert notifications in Microsoft Defender is crucial to ensuring a rapid and effective response to potential threats. These notifications enable your security team to be immediately informed of suspicious activity or security incidents, reducing response time and limiting potential damage. By receiving real-time alerts, administrators can take corrective action quickly, preventing threats from spreading and further compromising the network. What's more, alert notifications help maintain constant vigilance, ensuring that security incidents don't go unnoticed and systems remain protected from attack.
To do this :
Go to Defender admin portal : https://security.microsoft.com/
Open "System" from the left menu bar.
Select "Settings"
Select "Endpoints"

in general section select "Email notifications"
select "Alert"
select "Add notification rule"

give a name to the new notification rule then click next.

in notification window select all notification settings
select alert severity that you want to receive (I have selected low, medium and high)
click next

Add "Recipient email address"
click "Next"
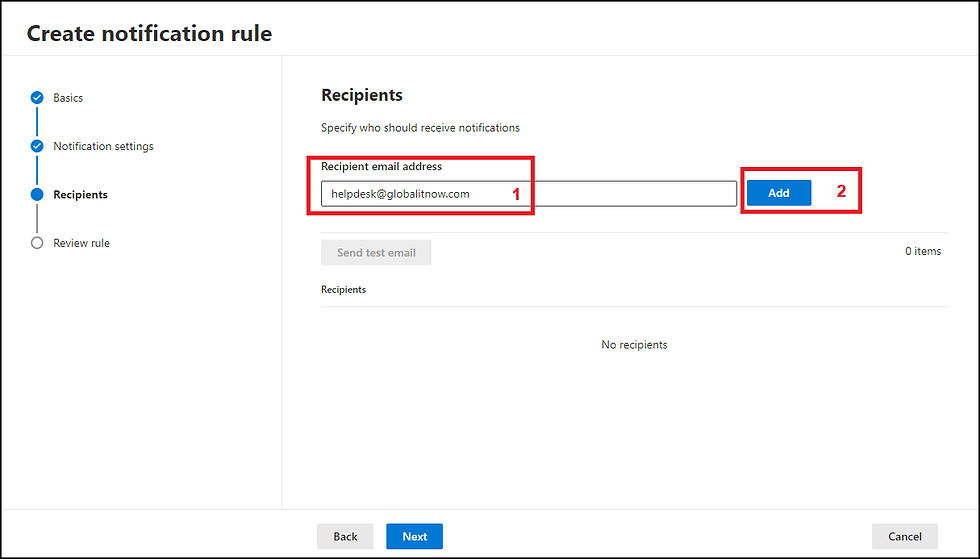
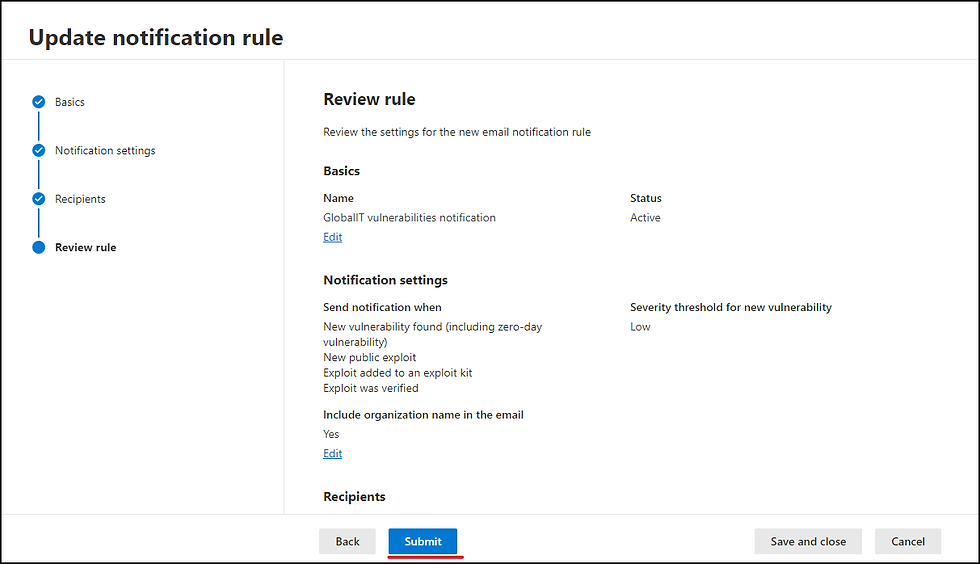
Review all settings then clic "Submit"

C - Setup Vulnerabilities notifications
Configuring vulnerability notifications in Microsoft Defender is essential for maintaining proactive and reactive security within your organization. These notifications enable your security team to be immediately informed of newly detected vulnerabilities, giving them the opportunity to take corrective action before these flaws are exploited by attackers. By receiving real-time alerts, administrators can prioritize necessary patches and updates, reducing the risk of major security incidents. What's more, these notifications help maintain constant vigilance, ensuring that systems remain protected against emerging threats and that security policies are always up to date.
in general section select "Email notifications"
select "Vulnerabilities"
select existing vulneability rule
select "Edit"

review rule name and click next

in notifications settings select severity of vulnerabilities notification
click next

Add Recipient Email Address and click next (I'm putting here my system ticket email address to open new ticket automatically for new alerts).

Review settings and clik submit
D - Check Defender for Endpoint Settings
Checking Microsoft Defender for Endpoint settings in Intune during configuration is crucial for several reasons. Firstly, it ensures that communications between Intune and Defender for Endpoint are correctly established, enabling effective management of security policies. Correct configuration also ensures that devices are properly integrated and monitored, which is essential for detecting and responding rapidly to threats. What's more, by checking settings, you can ensure that compliance and conditional access policies are applied consistently, thereby reducing security risks. Finally, it enables you to maintain greater visibility and transparency over device status and security, ensuring that all protective measures are in place and working as intended.
so be sure that the following setting are enabled :

E - Create Intune Detection and Response Policy
Creating a detection and response policy in Microsoft Intune is crucial to strengthening your organization's security. This policy integrates Microsoft Defender for Endpoint with Intune, providing advanced, near-real-time attack detection capabilities. Thanks to this integration, security analysts can effectively prioritize alerts, gain full visibility of the extent of a breach, and take response measures to remediate threats. In addition, the detection and response policy helps manage endpoint security settings and integrate devices with Microsoft Defender for Endpoint, ensuring consistent, proactive protection against threats. This helps minimize security risks and maintain a secure, resilient IT environment.
Let's get stared :
go to intune admin center : https://intune.microsoft.com/
select "Endpoint security" from the left menu bar
select "Endpoint detection and response"
click "Create policy"
select plateform and profile (I'm using windows in my case)
click "Create"

give a name to new policy and click next

in configuration settings :
Microsoft defender for Endpoint ... : Auto from connector
Sample Sharing : All
Telemetry is depricated so no need to configure it.

You can add scope here

Select and add groups to be targeted (I have selected all users all gropups)
Click Next

Now we are done with endpoint detection and response policy, let's move to create Antivirus Policy.
F - Create Antivirus Policy
Creating an Antivirus Policy in Microsoft Intune is crucial for several reasons :
Threat protection: Ensure that all managed devices are protected against viruses, malware and other threats.
Compliance : Maintain compliance with corporate security policies and external regulations.
Centralized management : Enable centralized management of antivirus settings, facilitating updates and policy changes.
Risk reduction : Minimize security risks by applying consistent policies and monitoring threats in real time.
Reporting and analysis : Provide detailed reports on the security status of devices, helping to identify and respond rapidly to security incidents.
These policies help maintain a secure environment and protect the organization's sensitive data.
To create an Antivirus Policy, there are a huge number of parameters to configure for this policy, and to leave no place for error, I've followed Microsoft's recommendations for all settings from the security baselines.
lets get started :
Go to Intune portal :
Select "Endpoint Security"
Select "Antivirus"
Click "Create Policy"
Select Plateform and profile (I'M using Windows in my case)
Click Create

Give a new name to your Policy.

Security Settings as Microsoft Recommandations

Security Settings as Microsoft Recommandations

Security Settings as Microsoft Recommandations

Security Settings as Microsoft Recommandations
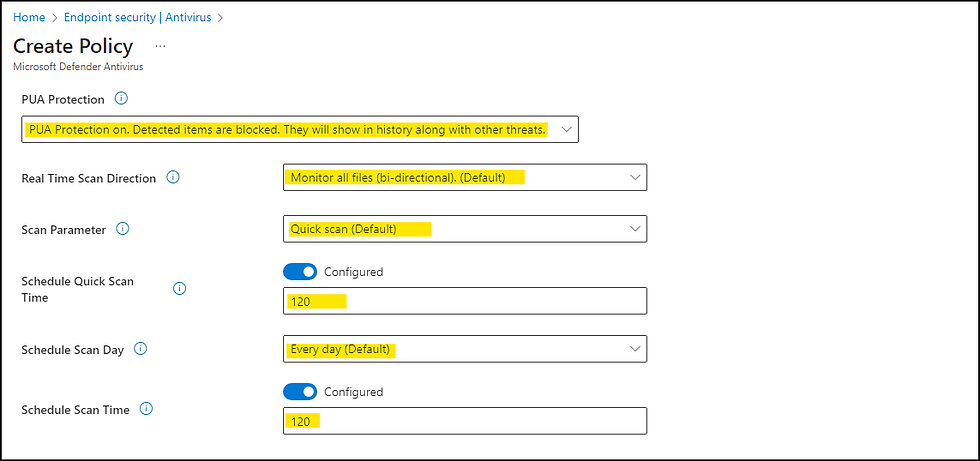
Security Settings as Microsoft Recommandations

Security Settings as Microsoft Recommandations

Select and add Groups as your company needs and click next

Review settings and click "Save"

Now we are done with all configurations, we cam jump to the next section to run a detection test.
8 - Run a detection test
Launching an “Test detection” with a PowerShell script provided by Microsoft after configuring Microsoft Defender for Endpoint is crucial for several reasons. Firstly, this test verifies that devices are properly integrated and communicating effectively with the Defender for Endpoint service. This ensures that devices can send health signals and security alerts, which is essential for continuous monitoring and rapid response to threats. In short, this test is a key step in ensuring that your security environment is up and running, ready to detect and respond to threats effectively.
Let's get started :
Go to Microsoft Defender portal
Go to "System" menu then "Settings"
Go to "Device Management" section then select "Onboarding"
Copy detection script and execute it in any enrolled device
You can access directly to this window from this link : https://security.microsoft.com/securitysettings/endpoints/onboarding

the following script is the script provided by Microsoft to make detection test :
powershell.exe -NoExit -ExecutionPolicy Bypass -WindowStyle Hidden $ErrorActionPreference= 'silentlycontinue';(New-Object System.Net.WebClient).DownloadFile('http://127.0.0.1/1.exe', 'C:\\test-WDATP-test\\invoice.exe');Start-Process 'C:\\test-WDATP-test\\invoice.exe'
After execution the script, come back to "Onboarding" section and refresh browser.
you will be able to see : First detection test is completed successfully

9 - Check and investigate the previous test in Defender portal
In this section we will investigate the previous test in defender Alerts to explore what we can see there :
Go to defender portal :
Select "Investigation & response" then select "Incidents & alerts"
Select "Alerts"
Select the first alert

On the top of the windows we can see user/device relaited details
On the bottom we can see the process tree for our script execution.

we can see even the executed script as you can see in the following screenshot.

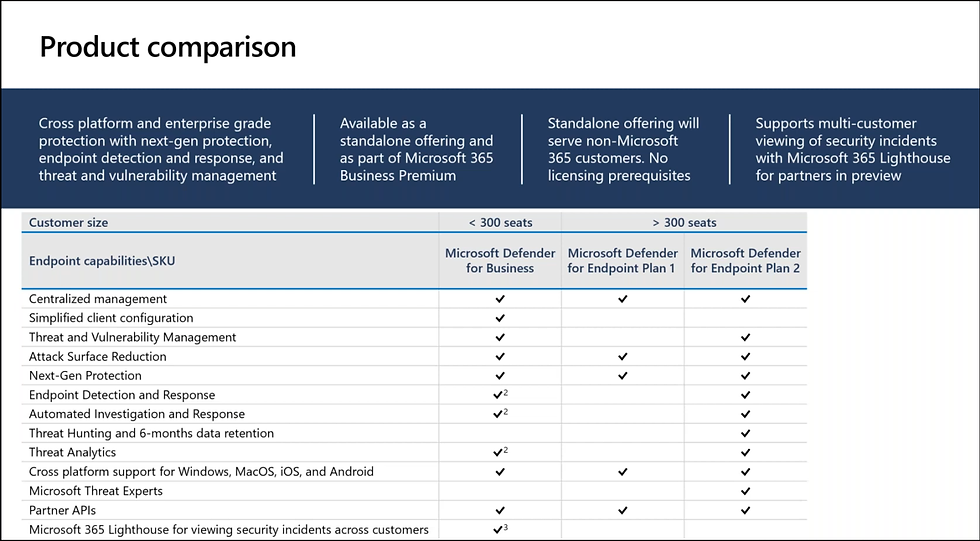
10 - If you want to compare Defender for Business, Defender for Endpoint P1 and Defender for Endpoint P2 capabilities
If you want to know mutch more about Defender for Business, Defender for Endpoint P1 and Defender for Endpoint P2 , here is detailed product comparison :


11 - Conclusion
In conclusion, Microsoft Defender for Business is an essential cybersecurity solution for SMEs looking to protect their data and systems from online threats. With its advanced features, ease of use and affordable cost, it offers enterprise-grade protection without the complexity often associated with traditional security solutions. By adopting Microsoft Defender for Business, SMBs can focus on growth and innovation, with the peace of mind that their digital assets are well protected.
Thanks
Aymen EL JAZIRI
Microsoft MVP


Commentaires